Using IAM Roles for Node Bootstrapping
Overview
OpenShift clusters are typically deployed all at once. To scale these up or down, you must re-run the Ansible installer
or you must configure the cluster auto-scaler. But what if we wanted to scale nodes up and down without using the auto-scaler? For instance,
you know you will require a certain number of pods and a specific amount of compute power, but you want to pre-warm it
without having to wait for the auto-scaler to kick in. Or you want to bootstrap new nodes without storing the
bootstrap kubeconfig. For this, we can use IAM roles to allow the new compute nodes to connect to the Masters and
bootstrap.
Note: The code displayed uses Terraform 0.12.x, but the concepts should still apply for Terraform 0.11.x
This example will create a number of items outside of OpenShift that are the basics required to get up and running in an AWS VPC, specifically:
- VPC
- Client VPN endpoints
- Certificates for the endpoints
If these items are not required, you can skip the vpc module and continue on to the openshift module.
AWS IAM Authenticator
Initially released by Heptio and now part of the Kubernetes SIGs projects, the aws-iam-authenticator is now maintained by Heptio and Amazon EKS engineers. This project provides a method to authenticate against a Kubernetes (and OpenShift) cluster using IAM roles. We will integrate this project with OpenShift in order to allow compute nodes to bootstrap using the IAM instance profile attached to the EC2 instance.
Deploy OpenShift
Deploying the OpenShift cluster will be similar to how an OpenShift cluster can be deployed using Terraform. The key difference is that the control plane will be deployed first and updated, prior to deploying the compute nodes. This separation allows for the scaling of the compute nodes separate from the rest of the cluster.
The Terraform plan deploys everything at once for convenience but after the creation of the compute Autoscaling groups, they can be scaled individually.
Follow the previous post to deploy the VPC and begin the OpenShift deployment.
Deploy Control Plane
The first stage of the openshift Terraform plan is to deploy the bastion node and the control plane nodes. Once the
control plane AutoScaling group is ready, the bastion will begin the cluster install. To save resources, we’ve combined
the Masters and Infra on the same node, but they could be easily separated out if desired. The control plane is
deployed with the following option set in the Ansible inventory file:
        osm_api_server_args:
          authentication-token-webhook-config-file:
            - /etc/origin/cloudprovider/aws-iam-authenticator/kubeconfig.yaml
This configuration adds the authentication-token-webhook-config-file command-line option to the Master API server pod
on startup. This tells the API server where to find the kubeconfig for the token webhook which the API server will use
to validate any authentication tokens that are sent to it.
Update Auth Config
Once the control plane is deployed and the Masters are installed and ready, we’ll need update the Master config YAML to
add our webhook settings. We’ll need to remove the existing authConfig and oauthConfig sections and add our custom
authConfig section which looks like this:
authConfig:
  webhookTokenAuthenticators:
    - configFile: /etc/origin/cloudprovider/aws-iam-authenticator/kubeconfig.yaml
After we add this setting, we’ll need to restart the Master API pods.
You can see the playbook that updates all the masters here.
Deploy Authenticator
Now that we’ve updated the Master configuration, we’ll need to actually deploy the AWS IAM Authenticator server so the
Master can actually find it to use for token verification. There are a few prerequisites we need to handle before we
can deploy the daemonset. The first one is to patch the kube-system namespace to actually allow us to deploy
daemonsets in that namespace. Using the patch command, we add this to the namespace:
metadata:
  annotations:
    openshift.io/node-selector: ""
With that done, now we’ll need to login to AWS ECR (since that is where we’ll be pulling the image from) and save that token as a pull secret:
sudo `aws ecr get-login --no-include-email --registry-ids 602401143452 --region <region name>`
sudo cp /root/.docker/config.json ./
sudo chown ec2-user:ec2-user config.json
oc create secret generic aws-pull-secret --from-file=.dockerconfigjson=config.json --type=kubernetes.io/dockerconfigjson -n kube-system
Once that’s done, we can deploy the AWS IAM Authenticator server. The aws-iam-authenticator project provides a
sample file that gives us
most of what we need. We need only to provide the cluster name and update the ConfigMap to provide the role mappings we
desire. We’ll give the bastion node system:masters permissions and the compute nodes will get system:bootstrapper
permissions:
# a unique-per-cluster identifier to prevent replay attacks
# (good choices are a random token or a domain name that will be unique to your cluster)
clusterID: ${openshift-cluster-name}
server:
  mapRoles:
  # Make the bastion an admin for convenience
  - roleARN: ${bastion-role-arn}
    username: aws::instance:
    groups:
    - system:masters
  # New instances can bootstrap using their own role
  - roleARN: ${worker-role-arn}
    username: system:node:
    groups:
    - system:nodes
    - system:bootstrappers
    - system:node-bootstrapper
We’ll also need to provide for the auto-approval of CSRs in order to allow nodes to join the cluster without manual or human intervention:
oc create clusterrolebinding node-client-auto-approve-csr \
  --clusterrole=system:certificates.k8s.io:certificatesigningrequests:nodeclient \
  --group=system:node-bootstrapperkubectl \
  --clusterrole=system:certificates.k8s.io:certificatesigningrequests:selfnodeclient \
  --group=system:nodes

oc create clusterrolebinding node-client-auto-renew-crt \
  --clusterrole=system:certificates.k8s.io:certificatesigningrequests:selfnodeclient \
  --group=system:nodes
Scale Nodes
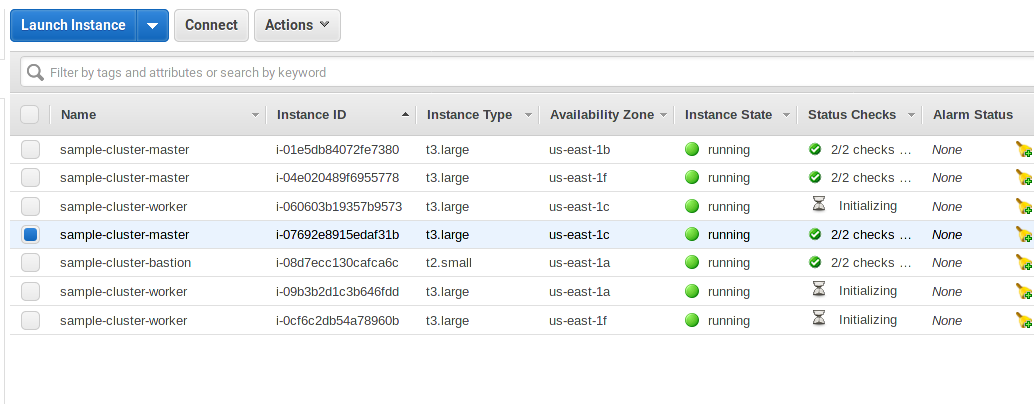
Once the Masters are setup and the authenticator server is deployed, we can deploy the Compute Nodes (done automatically via Terraform). The Terraform plan will initially deploy 3 nodes. You can log on to one of the Masters and check the status of the nodes. It may take a little bit longer than when the nodes appear in the AWS Console since they bootstrap themselves through UserData.
As seen in the screenshot, the nodes have started but are not yet done bootstrapping:

[ec2-user@ip-10-0-2-47 ~]$ oc get nodes
NAME                         STATUS    ROLES                  AGE       VERSION
ip-10-0-1-72.ec2.internal    Ready     compute,infra,master   33m       v1.11.0+d4cacc0
ip-10-0-2-47.ec2.internal    Ready     compute,infra,master   33m       v1.11.0+d4cacc0
ip-10-0-4-113.ec2.internal   Ready     compute,infra,master   33m       v1.11.0+d4cacc0
It may take a few minutes for the nodes to finish up (possibly 10 or more minutes).

[ec2-user@ip-10-0-2-47 ~]$ oc get nodes
NAME                         STATUS     ROLES                  AGE       VERSION
ip-10-0-0-97.ec2.internal    NotReady   compute                39s       v1.11.0+d4cacc0
ip-10-0-1-198.ec2.internal   Ready      compute                8m        v1.11.0+d4cacc0
ip-10-0-1-72.ec2.internal    Ready      compute,infra,master   1h        v1.11.0+d4cacc0
ip-10-0-2-47.ec2.internal    Ready      compute,infra,master   1h        v1.11.0+d4cacc0
ip-10-0-3-124.ec2.internal   Ready      compute                8m        v1.11.0+d4cacc0
ip-10-0-4-113.ec2.internal   Ready      compute,infra,master   1h        v1.11.0+d4cacc0
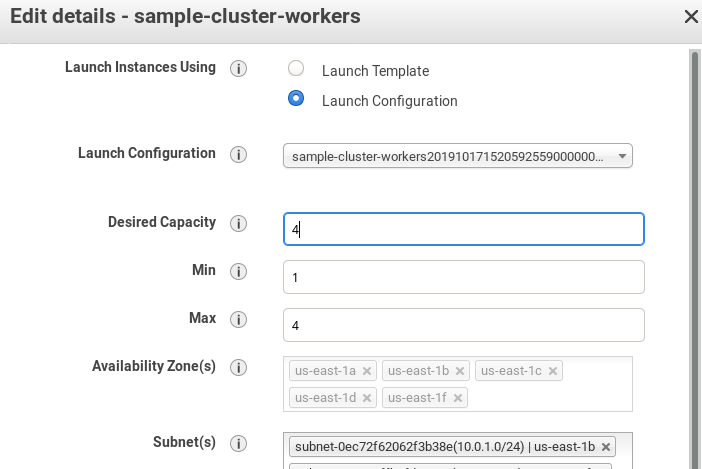
Now that the three nodes are ready, we’ll try to scale the cluster up by one node. Go to the AWS Console and edit the
Worker Auto Scaling Group to increase the desired and max from 3 to 4:

In a minute or so, you should see the new node booting up:

And after about 10 minutes, you should see the new node in the “Ready” state:
[ec2-user@ip-10-0-2-47 ~]$ oc get nodes
NAME                         STATUS    ROLES                  AGE       VERSION
ip-10-0-0-97.ec2.internal    Ready     compute                22m       v1.11.0+d4cacc0
ip-10-0-1-198.ec2.internal   Ready     compute                30m       v1.11.0+d4cacc0
ip-10-0-1-72.ec2.internal    Ready     compute,infra,master   1h        v1.11.0+d4cacc0
ip-10-0-2-104.ec2.internal   Ready     compute                36s       v1.11.0+d4cacc0
ip-10-0-2-47.ec2.internal    Ready     compute,infra,master   1h        v1.11.0+d4cacc0
ip-10-0-3-124.ec2.internal   Ready     compute                29m       v1.11.0+d4cacc0
ip-10-0-4-113.ec2.internal   Ready     compute,infra,master   1h        v1.11.0+d4cacc0
So now you should be able to scale nodes at will, making it easy to pre-warm a cluster to an arbitrary number of nodes without having to worry about where to store your bootstrap configuration. And the added bonus of now being to make use of IAM roles both inside and outside to the cluster to manage permissions.